Hole Manager
Select Tools tab > Manage group > Holes > Holes to open the Hole Manager dialog. In this dialog, you can request holes to be created in objects managed by peer applications such as CADMATIC Hull or NAPA. Opening this tool makes all hole request objects visible in the 3D model, and automatically retargets hole requests checked out to you.
Hole Manager enables coordinating the hole creation workflow between design groups and provides an easy way to check statuses.
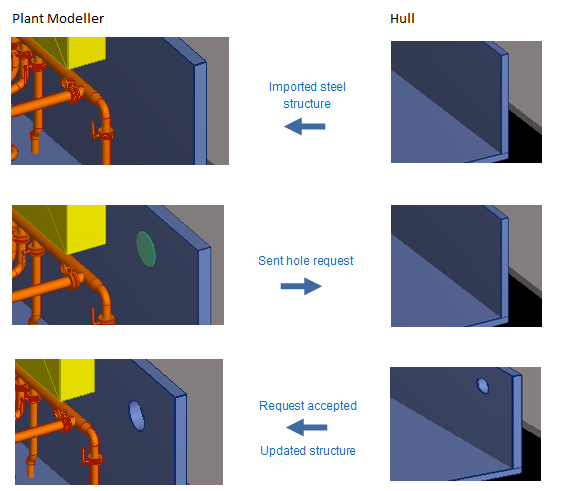
For example, when the hull of a ship is designed in CADMATIC Hull, a piping designer working in Plant Modeller can request a hole in a hull plate imported as a reference into the outfitting model. The request is then sent from Plant Modeller to Hull, where hull designers can accept or reject it.
Holes can be requested for different purposes:
-
Pipe penetration – A hole for pipes passing through a penetration component in a hull structure such as bulkhead, deck, or stiffener.
-
Free penetration – A hole for pipes passing through a bulkhead.
-
Staircase – Openings for a staircase between decks.
-
Simple hole – A hole to provide passage to a certain space or access to equipment.
Hole requests can be created as part of modeling or in the Hole Manager tool, depending on the type of hole or opening. All hole requests are managed in the Hole Manager tool.
Hole request checks
These checks are performed when Hole Manager starts up and after area updates to verify that hole requests and holes are synchronized:
- Is the hole location as requested?
- Is the hole shape as requested?
- Is the hole orientation as requested?
- Are the hole dimensions as requested?
If any check fails, Hole Manager notifies the user.
Note: These checks apply only to hole request objects the current user owns or can attempt to check out.
Hole request search and filtering
In the Hole Manager dialog, you can select a category from the left pane to list the hole requests in that category. Additionally, you can use these tools to list specific hole requests:
-
Advanced
-
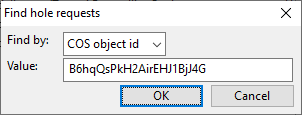
Select Advanced > Select attribute to search to find hole requests based on an attribute value in the hole request or its trigger object.
-
Select Advanced > Pick trigger from model to select specific hole requests by picking each hole request or its trigger object from the 3D model.
-
-
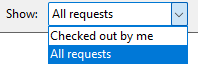
Show
-
Select whether to display all hole requests or only hole requests you have checked out.
-
Hole request categories
In the Hole Manager dialog, the left pane shows the hole request categories. The project configuration determines which additional categories are shown. Selecting a category displays the associated hole requests.
|
Category |
Description |
||||||||||||||||
|---|---|---|---|---|---|---|---|---|---|---|---|---|---|---|---|---|---|
|
Shows all hole requests, arranged by request status (new, pending, accepted, rejected) and sub-status (creation, change, deletion). If using integration with CADMATIC Hull or NAPA, see CADMATIC Hull or Hole requests in NAPA integration. |
|||||||||||||||||
|
Displays hole requests that target CADMATIC Hull objects, arranged by the block of the target object. |
|||||||||||||||||
|
Displays hole requests that target NAPA objects, arranged by the block of the target object. |
|||||||||||||||||
|
Displays hole requests that have the attribute specified in the Hole Management options, arranged by the attribute values. |
|||||||||||||||||
|
Displays hole requests that require user attention, arranged by the type of issue. Hole request objects can have the following issues:
|
Hole request list
In the Hole Manager dialog, the hole request list displays the hole requests in the selected category. The list provides information such as the creator of the hole request, the shape and dimensions, and the current status of the hole request.
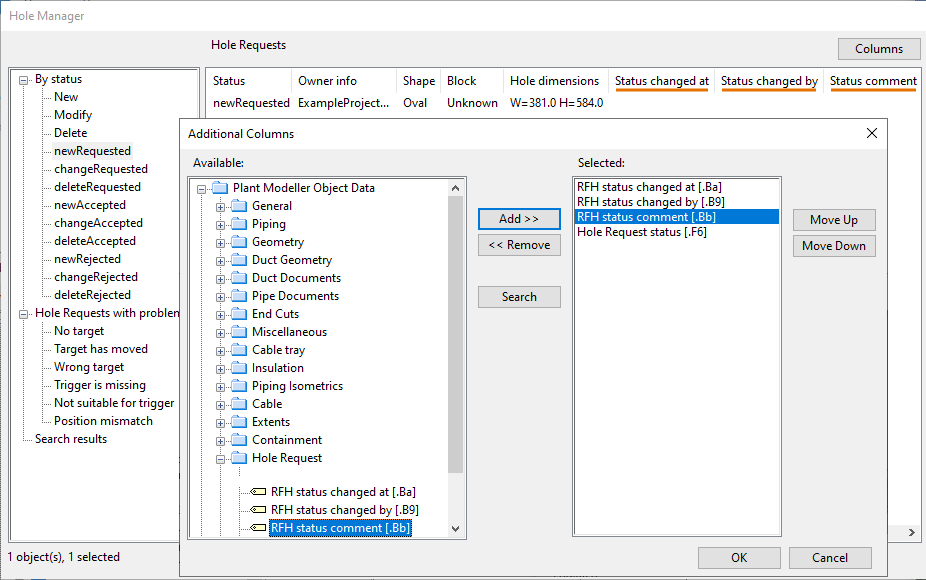
You can customize the list view by adding columns: select Columns and then either Hole request attributes or Target object attributes.


Default columns include:
-
Status – Displays the By status category of the hole request.
-
Issues – Displays the issue of a hole request located in the Hole requests with issues categories.
-
Hull messages – Displays the reason why a hole request was rejected in CADMATIC Hull.
Selecting an item from the hole request list opens a separate view that displays the hole request object, target object, and trigger object (if it exists). Selecting multiple hole requests shows them all in the same view.
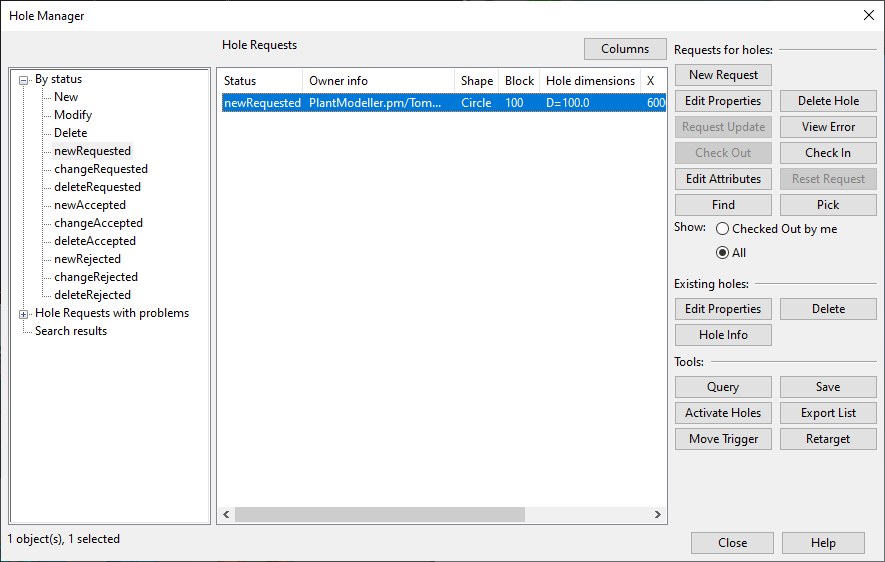
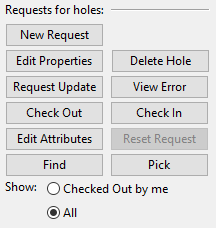
Hole manager action buttons
The Hole Manager dialog displays a number of action buttons arranged into groups.
Hole requests | Tools | Existing holes | Manual status control
Hole requests
In the Hole Manager dialog, the Hole requests section includes the following tools.
|
Action |
Description |
|---|---|
|
Starts the creation of a new hole request. First you pick the target object and the location of the hole. Hole Manager creates a default circular hole at the designated point and opens the Properties of Hole Request editor where you can select the hole shape (see Hole types) and specify the dimensions, location, and orientation of the hole to create. Clicking OK creates the hole request and sets it status to 'To be created'. Note: To create a hole request for a Hull profile, the profile must be a regular profile. A profile that has been created as a property of a plate must be converted to a regular profile in Hull before a hole request can be created for it. |
|
|
Requests the peer application to process the selected hole requests. This action checks in the hole requests, sets the value of the 'Design status' (.F5) attribute from 'Under Work' to 'For production', and saves the area model. Depending on the situation, the status of the hole request is set to 'Creation requested', 'Change requested', or 'Delete requested'.
|
|
|
Allows resetting the status of a hole request made for CADMATIC Hull, so that it changes from 'Creation accepted' to 'Creation requested' or from 'Change accepted' to 'Change requested'. This allows the hole request to show up in Hull as new or modified, respectively, and the request can be processed as usual. |
|
|
Checks out as many of the selected holes as possible. This action leads to an area model update which results in Hole Manager performing the checks described in Hole request checks. |
|
|
Checks in the selected hole requests. |
|
|
Opens the Properties of Hole Request dialog for modifying the hole request. You might not be able to edit all parameters, such as location, if the hole request has a trigger object. In this case, location can be modified by moving the trigger object. After the editing, the hole request status reflects the new situation:
|
|
|
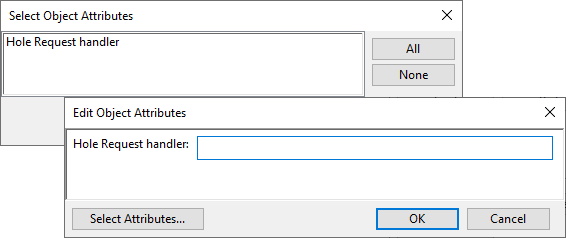
Allows selecting which attributes to assign to the selected hole requests, as described in Attributes.
Note: Attributes assignable to hole requests are specified in the 'RHF Info Out' attribute class. If you change the value of an attribute that is in this class, the status of the hole request is changed to either 'To be created' or 'Change requested'. |
|
|
If the selected hole requests already have holes, this action requests the holes to be deleted, and the status of the hole request is set to 'Delete requested'. If the selected hole requests do not have holes yet, this action deletes the hole request objects. |
|
|
Move the selected hole request's trigger object, but only if its type is Equipment. |
Tools
In the Hole Manager dialog, the Tools section includes the following tools.
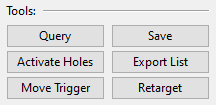
|
Action |
Description |
|---|---|
|
Opens the Object properties dialog for the selected hole request. |
|
|
Shows the hole request in a separate view. Press Esc to return to the dialog. |
|
|
Exports the selected or all hole requests to a CSV file. |
|
|
Opens the Retarget hole requests dialog where you can retarget hole requests that have lost their target object or have the wrong target object. |
|
|
Opens the Save dialog for saving the area model. |
|
|
Opens the Activate Hole Requests dialog where you can create hole requests for model objects. |
Existing holes
In the Hole Manager dialog, the Existing holes section includes the following tools.
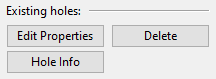
|
Action |
Description |
|---|---|
|
Opens the Properties of Hole Request editor for the hole you pick from the model. |
|
|
Displays information about the hole you pick from the model. The details shown depend on the peer application that owns the target object. |
|
|
Deletes the hole you pick from the model. |
Note: Some actions might not be available for certain holes. If the hole is in a CADMATIC Hull object, it may be locked by the peer application and cannot be modified in Plant Modeller. In this case, a message is displayed.
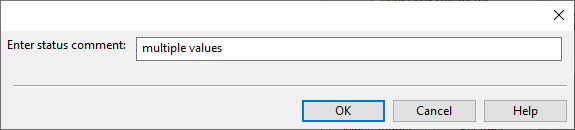
Manual status control
In the Hole Manager dialog, the Manual status control section is enabled if the Manual Status Control project settings define you as a status controller. You can use these tools to manually control the status of hole requests when the target objects are managed in a third-party hull software.
Note: NAPA integration normally uses a NAPA Agent to process hole requests. To enable manual status control for NAPA objects, the project administrator must enable the corresponding NAPA integration option.
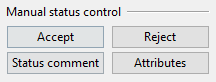
To see the status information in the dialog, add the relevant fields with the Columns button, as described in Hole request list.